Steps to enable Email Annotations
Introduction
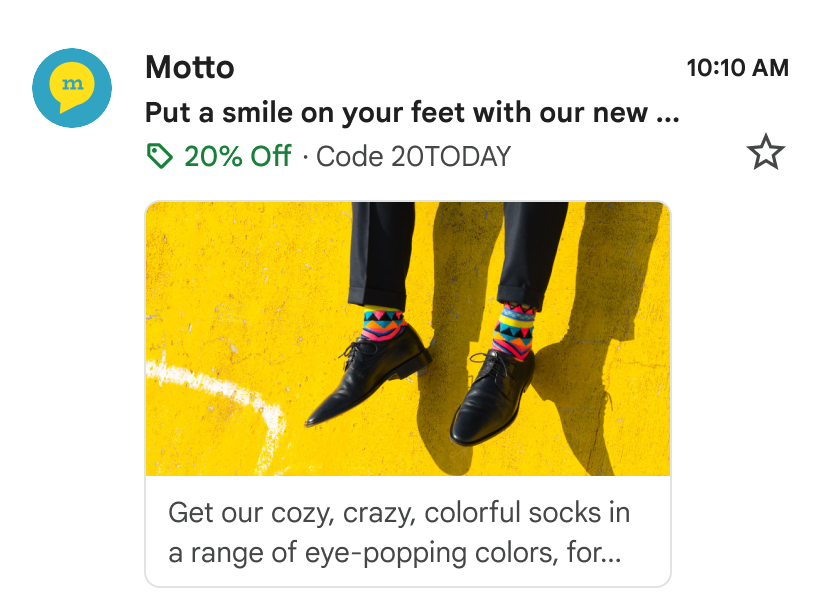
Email Annotations help your marketing emails stand out by adding rich, interactive details—such as offers, expiration dates, and promotional highlights—directly in the inbox. By enabling Email Annotations in AiTrillion, you can improve email visibility, increase engagement, and make it easier for customers to understand your message at a glance. This article walks you through the steps to enable Email Annotations so you can enhance your email campaigns and deliver a more impactful inbox experience.
Requirements for enabling email annotation
To use Gmail Email Annotations, your brand must first be added to Google’s allowlist, as only approved senders can access this feature. Email annotations enhance your messages by displaying rich details—like deals, product images, and special offers—directly within the Promotions tab on Gmail mobile.
- Request Allow listingEmail - p-promo-outreach@google.com with your domain(s), subdomains, and landing page URLs. Approval typically takes 7–10 business days.
-
Add Annotations to Your Email Template
Insert the relevant code snippet for the annotation type you want to use (deal highlight, carousel, or single image). Follow Image Guidelines
-
Use high-quality images (over 500 KB) with at least 256×256 px dimensions.
-
Maintain a rectangular aspect ratio.
-
Use the same image for all recipients (avoid unique images per user).
-
-
Understand Gmail’s Density Cap
Gmail limits the number of annotated emails visible in a user’s Promotions tab to prevent clutter. -
Test Before Sending
Note that annotations may not appear in small test sends; they are primarily designed for bulk campaign sends. -
Supported Environments
Annotations are visible only in the Promotions tab on Gmail’s mobile app, not in other tabs or web browsers. Troubleshooting Tips
If annotations don’t display, check:-
Your allowlisting approval status
-
Image quality and size
-
That the email is opened in the Promotions tab
-

Note: The code required for implementing Email Annotations is only compatible with custom HTML using code view or hybrid email templates. This functionality cannot be used with AiTrillion's drag-and-drop editor. We recommend using Email Annotations only if you’re technically proficient or have access to a developer who can assist with custom coding. While AiTrillion supports this feature, our support team cannot create or edit custom HTML templates beyond the general guidance provided in this documentation. To ensure the security and privacy of your data, AiTrillion's support team is unable to access or open your HTML files.
Here are the steps to enable email annotation on Gmail:
Step 1: Go to Email marketing >> Templates >> Create from scratch button or use the template. (In my case, I am using the Use template)
Step 2: Click on Code editor

Note: Email annotation will only work with the Code editor.
Step 3: Add the code as per your needs. Now, there are 3 types of annotation. Copy and paste the code in the head as per your need.

Note: You need to copy and paste the code below of the required annotation in the head section of AiTrillion's HTML editor.

// Build the first image preview in your product carousel:
    <div itemscope itemtype="http://schema.org/PromotionCard">
      <meta itemprop="image" content="IMAGE_URL1"/>      <meta itemprop="url" content="PROMO_URL1"/>
      // Optionally, include the following PromotionCard properties:
      <meta itemprop="headline" content="HEADLINE1"/>      <meta itemprop="price" content="PRICE1"/>      <meta itemprop="priceCurrency" content="PRICE_CURRENCY1"/>      <meta itemprop="discountValue" content="DISCOUNT_VALUE1"/>      <meta itemprop="position" content="POSITION"/>    </div>

    // Build the second image preview in your product carousel:
    <div itemscope itemtype="http://schema.org/PromotionCard">
      <meta itemprop="image" content="IMAGE_URL2"/>      <meta itemprop="url" content="PROMO_URL2"/>
      // Optionally, include the following PromotionCard properties:
      <meta itemprop="headline" content="HEADLINE2"/>      <meta itemprop="price" content="PRICE2"/>      <meta itemprop="priceCurrency" content="PRICE_CURRENCY2"/>      <meta itemprop="discountValue" content="DISCOUNT_VALUE2"/>      <meta itemprop="position" content="POSITION"/>    </div>

    // To include more image previews, add additional PromotionCard objects.
    // You can include up to 10 image previews in a product carousel.
2.) Single image preview
    // Build the first image preview in your product carousel:
    <div itemscope itemtype="http://schema.org/PromotionCard">
      <meta itemprop="image" content="IMAGE_URL"/>      <meta itemprop="url" content="PROMO_URL"/>
      // Optionally, include the following PromotionCard properties:
      <meta itemprop="headline" content="HEADLINE"/>      <meta itemprop="price" content="PRICE"/>      <meta itemprop="priceCurrency" content="PRICE_CURRENCY"/>      <meta itemprop="discountValue" content="DISCOUNT_VALUE"/>    </div>
3.) Deal/Offers
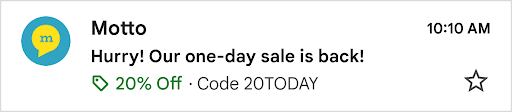
    <div itemscope itemtype="http://schema.org/DiscountOffer">
      <meta itemprop="description" content="DESCRIPTION"/>      <meta itemprop="discountCode" content="DISCOUNT_CODE"/>      <meta itemprop="availabilityStarts" content="START_DATE_TIME"/>      <meta itemprop="availabilityEnds" content="END_DATE_TIME"/>    </div>


Step 4: Once everything is done, click Save & exit.


Note: In some cases, Google may automatically extract information from your emails to create annotations — even if you haven’t added the annotation code manually. This process is entirely managed by Google and cannot be controlled or guaranteed by the sender.
Email Annotations Troubleshooting
Google enforces strict standards for displaying annotations, and they may not appear for various reasons. If your annotations aren’t visible after completing the setup steps, review the troubleshooting tips below:
1. Verify Your Brand Is Allowlisted
Google only permits approved brands to use email annotations to maintain security and prevent spam. If your brand isn’t on the allowlist, you’ll need to request access directly from Google.
To request allowlisting:
-
Contact Google using the instructions provided above.
-
Wait approximately 7–10 business days for a response.
-
Note that approval is not guaranteed — Google makes the final decision at its sole discretion.
2. Check Image Quality
All annotation images must meet Google’s visual quality standards. Low-quality or improperly formatted images will be filtered out and won’t appear in the Promotions tab.
Ensure your images meet the following criteria:
-
High quality (generally larger than 500 KB)
-
Minimal or no overlaid text
-
Rectangular shape — avoid circular or masked images
-
Minimum size of 256 × 256 pixels
-
The same image must be used for all recipients
Avoid using tools that generate CID (Content-ID) or per-recipient images, as Gmail will block annotations in those cases.
3. Consider Gmail’s Density Cap
Gmail limits the number of annotation images displayed in a user’s inbox at one time (known as a density cap). If the Promotions tab already contains several recent annotated emails, Gmail may suppress additional ones to avoid clutter. This limit is automatically enforced by Google and cannot be overridden.
4. Preview Sends May Not Show Annotations
Annotations often don’t appear in test or preview emails sent to a small number of recipients. This feature is intended for bulk sends — annotations are more likely to display when the campaign is sent to 100+ recipients.
5. Confirm You’re Checking the Supported Gmail Tab
Annotations only appear in the Promotions tab of the Gmail mobile app. They will not display in:
-
Any other Gmail tab (e.g., Primary, Updates, or Social)
-
Gmail accessed through web browsers (mobile or desktop)
-
Inboxes of users who have disabled the Promotions tab in their settings
Important Notes
-
Email Annotations are currently supported only in Gmail and may not appear in other email clients.
Annotations are displayed only for eligible promotional emails, transactional or non-promotional emails may not support them.
- Make sure your sender domain and IP are properly authenticated (SPF, DKIM, and DMARC) before enabling Email Annotations.
Google may take some time to process and display annotations, even after correct implementation.
- Email Annotations will not appear if the email lands in Spam or Promotions filtering restrictions are triggered.
- Ensure that all promotional details shown in annotations (offers, dates, discounts) match the email content to avoid user confusion.
Related Articles
Use Email Annotations to Feature Your Emails in Gmail Promotions Tab
Introduction Email Annotations let your promotional emails stand out in the Gmail Promotions tab by adding rich details like product images, discounts, and expiration dates directly to the inbox preview. By using structured data (JSON-LD markup) ...Create a Email template using an HTML editor
Introduction The HTML editor allows you to create fully custom email campaigns with complete control over design and layout. It’s ideal for users who want to use their own HTML code, import existing templates, or apply advanced styling beyond the ...How to Enable & Set Up AiTrillion on Your Shopify Store?
Setting up AiTrillion on your Shopify store is quick and easy! Follow these simple steps to activate the app and start leveraging its powerful features. ✅ Step-by-Step Guide: Step 1: Check Your Dashboard If you’re a new Shopify seller, you'll see a ...Enable Auto Optimization of Review Request Email
Introduction As review request emails are rendered differently across various browsers, devices, and email clients, AiTrillion offers the ability to choose the type of review request form-type that you wish to display to your customers. Here are the ...Steps to Grow Your WhatsApp Contact List
Introduction Growing your WhatsApp contact list is an important step for making the most of WhatsApp marketing. A larger, opt-in contact list allows businesses to reach more customers by using WhatsApp campaigns and WhatsApp flows. With the WhatsApp ...