Create a custom WhatsApp template
Custom WhatsApp templates allow businesses to send pre-approved, structured messages to customers for notifications, reminders, marketing campaigns, and transactional updates. These templates help ensure consistent communication, improve response rates, and comply with WhatsApp Business messaging policies.
By creating a custom WhatsApp template, you can personalize messages with dynamic variables, automate workflows, and streamline customer interactions. This article explains the step-by-step process to create and configure a custom WhatsApp template within the platform.
Here are the steps to create a custom WhatsApp template:
Step 1: Go to WhatsApp>> WhatsApp marketing >> Templates >> click on + icon
Step 2: Now, you can see various settings, which are as follows:
1. Template Name: Enter a unique name for your template. This name is used internally for identification and management purposes.
Example: Summer_Sale_Offer, Abandoned_Cart_Reminder
2. Category: Select the appropriate template category based on the purpose of your message:
Marketing – Promotional messages, offers, product launches, discounts.
Note:
1. If you use a WhatsApp template with the Marketing category, the soft messaging limit for new accounts is 250 messages per week, which will gradually increase with each campaign.
2. If you are using a marketing template, it is recommended to send 3–4 messages per individual per week initially, as per Meta guidelines.Utility – Transactional messages such as order confirmations, shipping updates.
Authentication – OTPs and verification messages.
Choosing the correct category ensures compliance with WhatsApp policies.

Note: Meta may update or reclassify the category of the template based on its content, regardless of the category you select.
3. Language: Select the language in which the template message will be sent. The selected language must match the message content.
4. Select Template Type: Choose the format of your WhatsApp template:
• Standard: Used for regular text-based promotional or informational messages. You can add media headers, body text, footer text, and buttons.
• Carousel:
Allows you to showcase multiple products or offers in swipeable cards. Each card can include:
Image or video
Description
- Call-to-action buttons
• Limited Time Offers:
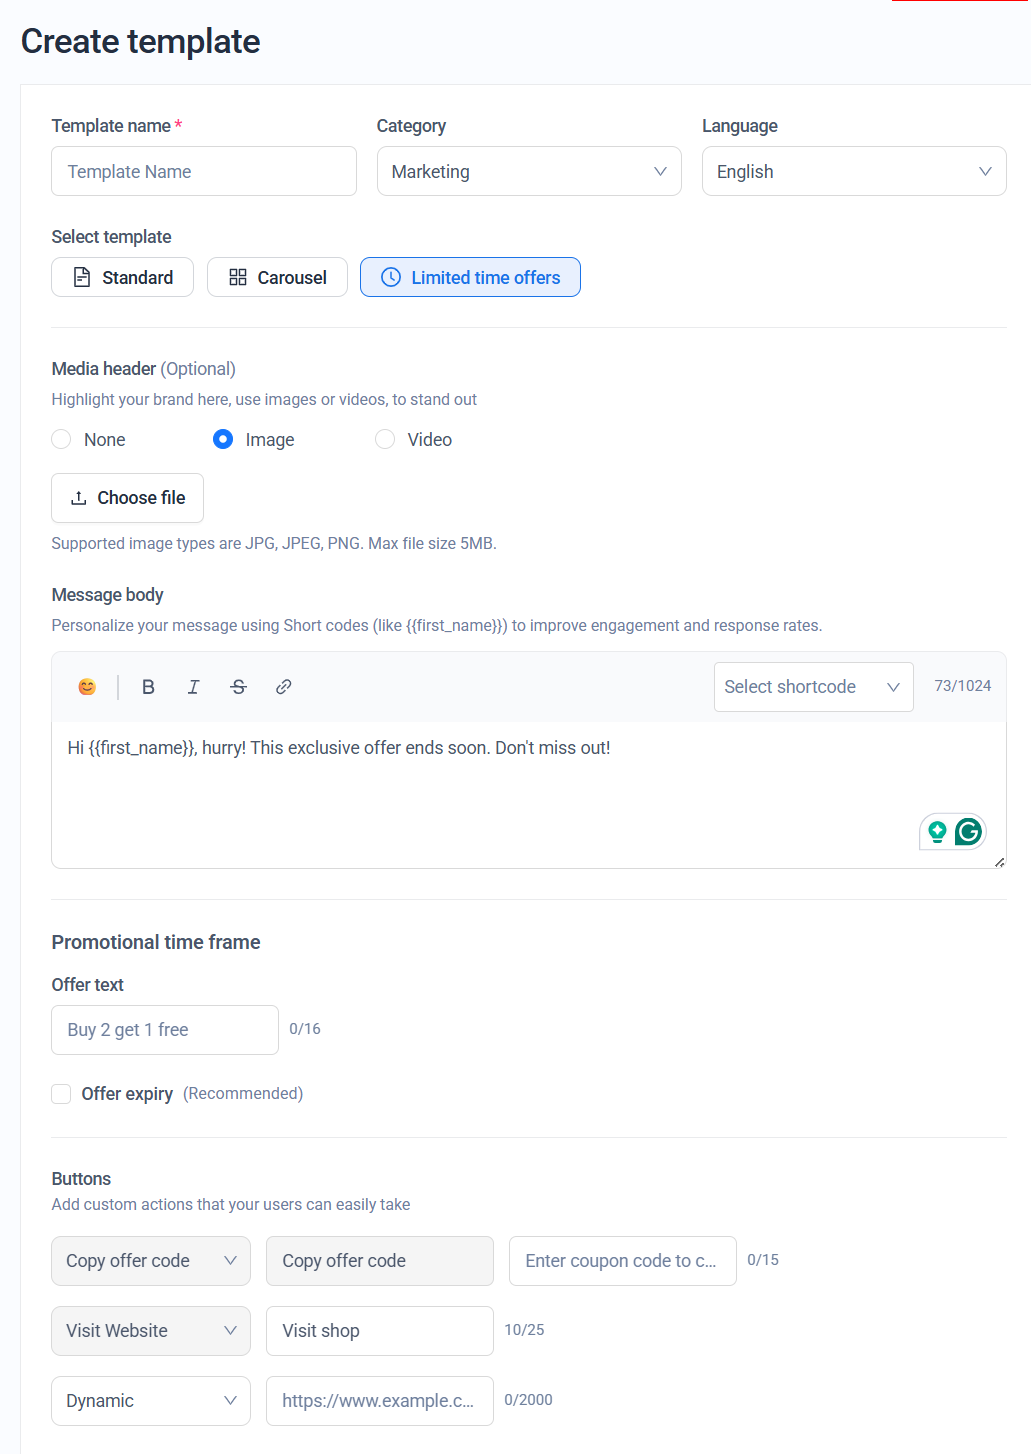
Designed specifically for promotional campaigns with urgency. Includes:
Offer text
Optional expiry
Coupon code button
Website redirect button
Best suited for flash sales and time-sensitive deals.
5. Campaign Title: Add a header to highlight your brand or promotion. You can choose:
None – No header
Text – Add a short promotional title (max 60 characters)
Image – Upload JPG, JPEG, PNG (max 5MB)
Video – Upload MP4 (max 5MB)
Document – Upload PDF, DOC, DOCX, XLS, XLSX, PPT, PPTX (max 5MB)
6. Message Body:
Enter the main message content.
Supports formatting (Bold, Italic, Strikethrough, Links)
Supports emojis
Supports shortcodes like
{{first_name}}for personalizationMaximum 1024 characters
7. Message Footer: Add additional small text below the message body (max 60 characters). Common uses:
Terms & Conditions
Unsubscribe info
Brand tagline
8. Buttons: Enable this option to add interactive buttons that guide customers toward action.
Call to Action Button: Allows users to:
Visit Website – Redirect to a URL of the website. You can also add the custom domain.
Call Phone - Add a support phone number so customers can contact you.
Quick replies (Carousel): Quick Reply buttons let users send a one-tap response without typing a message manually. When clicked, the selected response is automatically sent in the chat.
You must provide:
Button text
URL or coupon code (if applicable)
Buttons increase click-through and conversion rates.
9. Carousel Cards (For Carousel Templates Only): You can add up to 5 cards. Each card allows:
Media upload (Image or Video)
Card description
Call-to-action buttons
Use "Preview with sample data" to test how the template will appear.
10. Promotional Time Frame (Limited Time Offers Only): Configure offer details:
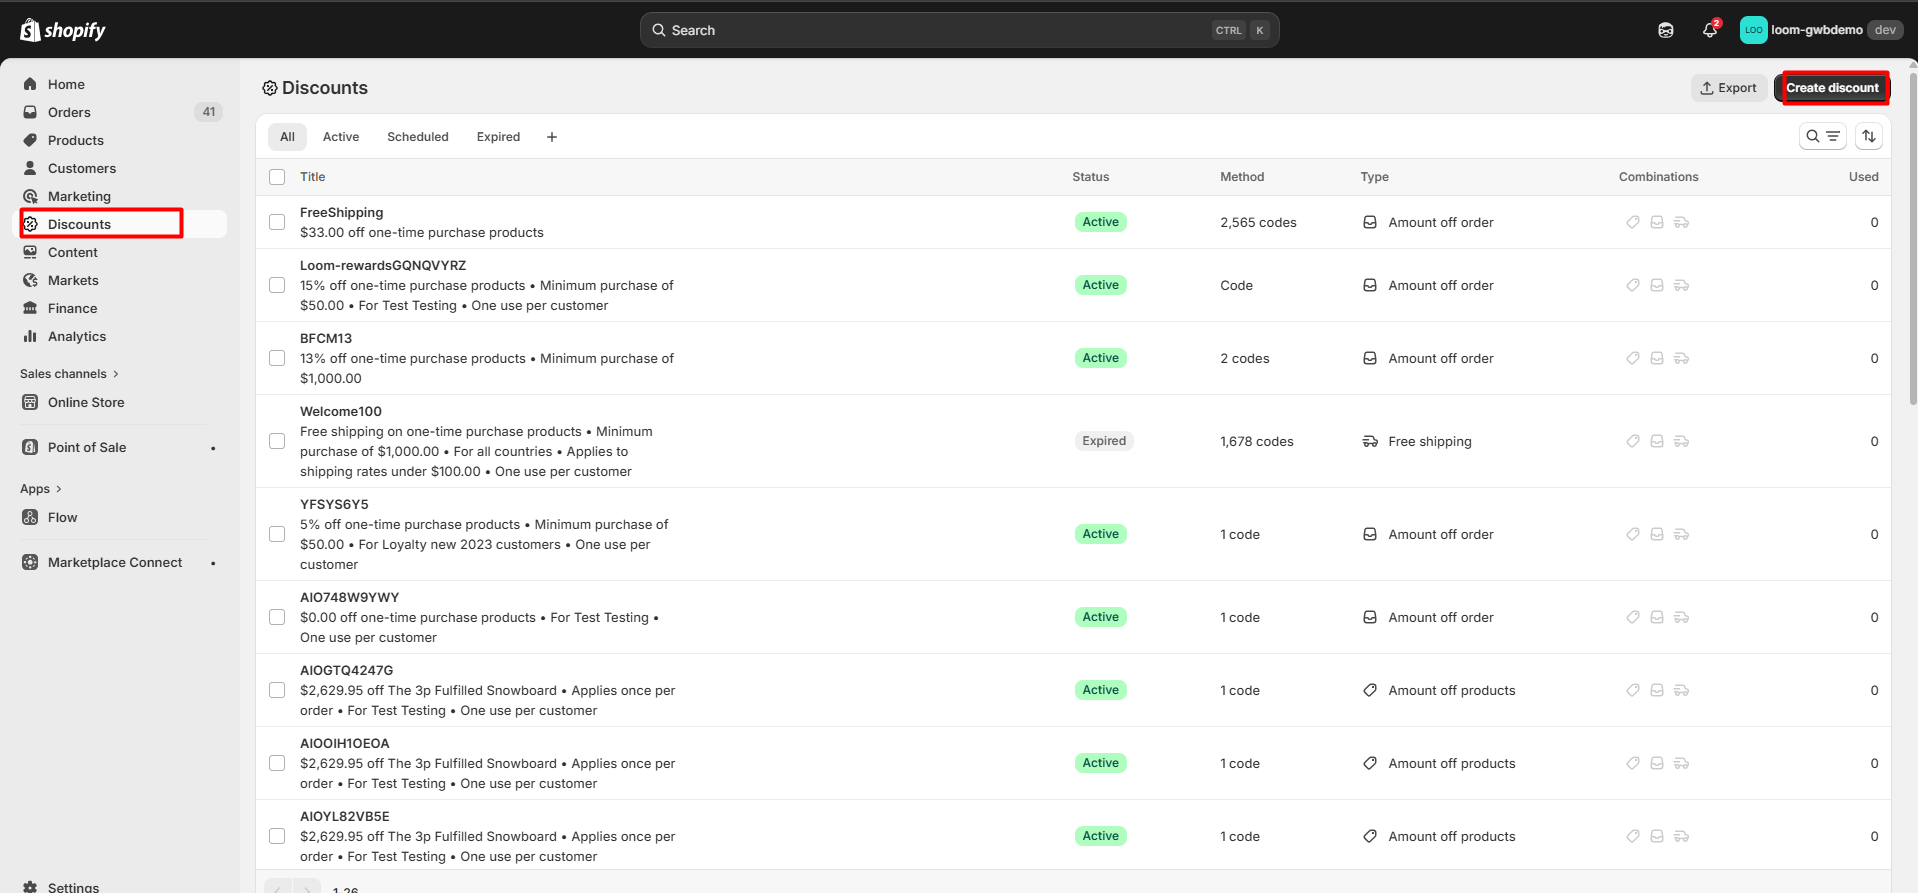
Note: Before adding the discount code, make sure the offer is created in Shopify. To create the discount in Shopify, go to Shopify admin >> Discount >> Click on the Create discount button and customize the settings as per your requirement.
Offer Text (max 16 characters)
Offer Expiry (Recommended for urgency)
Coupon Code
Website URL
This helps create urgency-driven campaigns.
Now, you can create and use the template as per your needs.

Note:
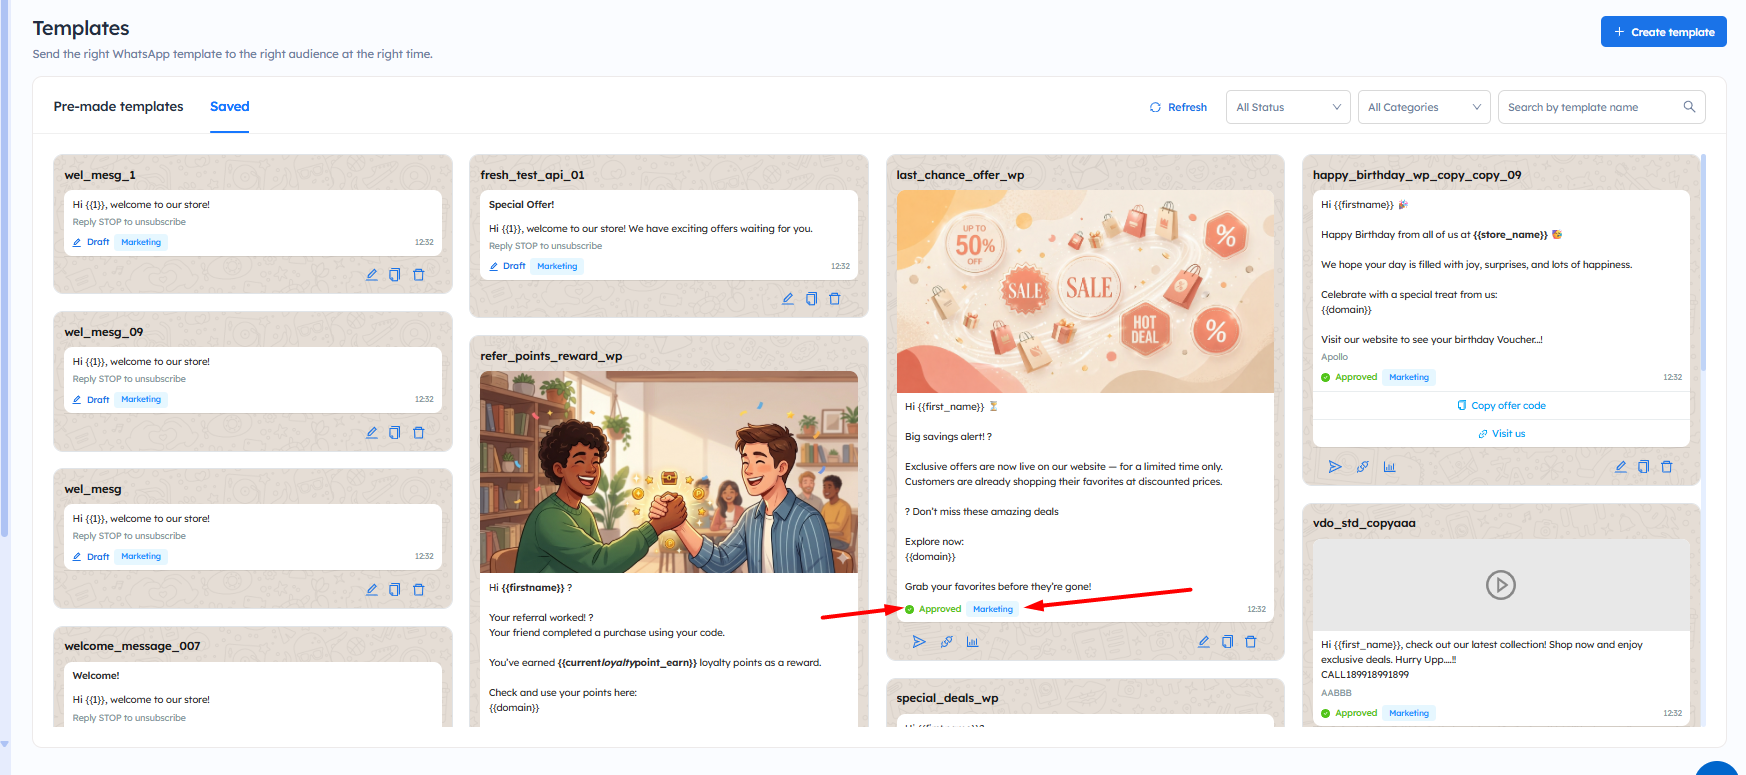
1. Once you create the template, it is sent to Facebook for approval. It may take 3–5 minutes to receive the approval or rejection status.
2. You can view the templates you have created along with their status by navigating to WhatsApp >> WhatsApp Marketing >> Templates >> Saved tab.
Note: You can also send the test message to understand how the test WhatsApp message will appear. To learn more, click here.
To learn how to edit the WhatsApp template, click here.
Important Notes:
- Templates must comply with WhatsApp Business messaging policies. Non-compliant templates may be rejected during approval.
- The selected Category (Marketing, Utility, Authentication) must match the message intent. Choosing the wrong category can lead to rejection.
- Media files must meet format and size requirements (Maximum 5MB). Unsupported formats will not be accepted.
- If you are using a marketing template, it is recommended to send 3–4 messages per account per week initially, as set by Meta.
- Ensure discount codes are already created in Shopify before adding them to the template.
- Buttons must have valid URLs or properly configured actions. Broken or invalid links may result in rejection.
- Limited Time Offer templates should include clear offer details and expiry (recommended) to create urgency and avoid confusion.
- Keep messages clear, concise, and action-oriented to improve engagement and approval success rate.
- Meta may update or reclassify the category of the template based on its content, regardless of the category you select.
- Ensure to check the category of the template before sending the WhatsApp campaign, WhatsApp workflow, or WhatsApp Messages to avoid capping or getting the account blocked.
Next⏭️
Related Articles
Use or edit the pre-made WhatsApp template
Introduction Using pre-made WhatsApp templates is a simple and efficient way to send messages to your customers while ensuring consistency and compliance. Instead of creating every message from scratch, you can use ready-made templates and customize ...Create WhatsApp Forms to Collect Information from Customers
Introduction WhatsApp Forms allow you to collect information directly from customers within WhatsApp, making it easier to gather leads, feedback, survey responses, registrations, and other customer details. With the WhatsApp Forms feature of ...Steps to Grow Your WhatsApp Contact List
Introduction Growing your WhatsApp contact list is an important step for making the most of WhatsApp marketing. A larger, opt-in contact list allows businesses to reach more customers by using WhatsApp campaigns and WhatsApp flows. With the WhatsApp ...Manage WhatsApp Conversations with Team Inbox
Introduction The Team Inbox (WhatsApp) enables you to efficiently manage all customer conversations from a single, centralized dashboard. It allows your team to view, organize, assign, and respond to WhatsApp messages in real time, ensuring no ...Request for WhatsApp Business API for Workflows and Campaigns
Introduction WhatsApp has become one of the most effective channels for engaging with customers in real time. By enabling the WhatsApp Business API, you can automate messages, send campaign broadcasts, and build personalized communication workflows ...